Nginx Images Larger Than 1m Not Uploading via Php
One of the almost useful, but ofttimes misunderstood and misconfigured, features of NGINX is rate limiting. It allows y'all to limit the amount of HTTP requests a user tin can brand in a given period of fourth dimension. A request can be as simple as a GET request for the homepage of a website or a Mail service asking on a log‑in form.
Rate limiting can exist used for security purposes, for instance to tedious down fauna‑force password‑guessing attacks. Information technology can help protect against DDoS attacks by limiting the incoming request rate to a value typical for existent users, and (with logging) place the targeted URLs. More generally, information technology is used to protect upstream application servers from being overwhelmed by too many user requests at the same time.
In this weblog we will cover the basics of rate limiting with NGINX besides equally more advanced configurations. Charge per unit limiting works the aforementioned fashion in NGINX Plus.
To learn more well-nigh charge per unit limiting with NGINX, sentry our on-need webinar.
NGINX Plus R16 and later support "global rate limiting": the NGINX Plus instances in a cluster employ a consistent rate limit to incoming requests regardless of which instance in the cluster the request arrives at. (Land sharing in a cluster is bachelor for other NGINX Plus features every bit well.) For details, run into our blog and the NGINX Plus Admin Guide.
How NGINX Rate Limiting Works

NGINX rate limiting uses the leaky bucket algorithm, which is widely used in telecommunications and packet‑switched computer networks to bargain with burstiness when bandwidth is limited. The analogy is with a bucket where h2o is poured in at the tiptop and leaks from the bottom; if the rate at which water is poured in exceeds the rate at which it leaks, the saucepan overflows. In terms of request processing, the water represents requests from clients, and the bucket represents a queue where requests await to be processed according to a first‑in‑first‑out (FIFO) scheduling algorithm. The leaking h2o represents requests exiting the buffer for processing past the server, and the overflow represents requests that are discarded and never serviced.
Configuring Basic Rate Limiting
Rate limiting is configured with ii main directives, limit_req_zone and limit_req, as in this example:
limit_req_zone $binary_remote_addr zone=mylimit:10m rate=10r/due south; server { location /login/ { limit_req zone=mylimit; proxy_pass http://my_upstream; } } The limit_req_zone directive defines the parameters for charge per unit limiting while limit_req enables rate limiting within the context where it appears (in the example, for all requests to /login/).
The limit_req_zone directive is typically defined in the http cake, making it available for employ in multiple contexts. It takes the following three parameters:
-
Key – Defines the asking feature confronting which the limit is applied. In the example information technology is the NGINX variable
$binary_remote_addr, which holds a binary representation of a client'southward IP address. This means we are limiting each unique IP address to the asking rate defined by the third parameter. (We're using this variable because information technology takes up less space than the string representation of a client IP address,$remote_addr). -
Zone – Defines the shared memory zone used to shop the state of each IP address and how often information technology has accessed a request‑limited URL. Keeping the information in shared retention means it can be shared among the NGINX worker processes. The definition has 2 parts: the zone name identified by the
zone=keyword, and the size following the colon. State information for nigh 16,000 IP addresses takes ane ;megabyte, so our zone tin shop well-nigh 160,000 addresses.If storage is exhausted when NGINX needs to add a new entry, information technology removes the oldest entry. If the space freed is still non enough to accommodate the new record, NGINX returns status code
503(ServiceTemporarilyUnavailable). Additionally, to prevent retention from being wearied, every fourth dimension NGINX creates a new entry it removes upward to two entries that take not been used in the previous 60 seconds. - Rate – Sets the maximum request rate. In the example, the rate cannot exceed 10 requests per 2nd. NGINX actually tracks requests at millisecond granularity, so this limit corresponds to i request every 100 milliseconds (ms). Because we are not allowing for bursts (meet the next section), this means that a request is rejected if it arrives less than 100ms subsequently the previous permitted one.
The limit_req_zone directive sets the parameters for rate limiting and the shared retentivity zone, only it does not actually limit the asking rate. For that yous need to apply the limit to a specific location or server cake by including a limit_req directive in that location. In the example, we are rate limiting requests to /login/.
So now each unique IP address is limited to x requests per second for /login/ – or more precisely, cannot make a request for that URL inside 100ms of its previous one.
Handling Bursts
What if we get 2 requests within 100ms of each other? For the second request NGINX returns condition code 503 to the client. This is probably non what nosotros want, considering applications tend to be bursty in nature. Instead we want to buffer any excess requests and service them in a timely manner. This is where nosotros use the outburst parameter to limit_req, as in this updated configuration:
location /login/ { limit_req zone=mylimit burst=xx; proxy_pass http://my_upstream; } The burst parameter defines how many requests a client tin brand in excess of the charge per unit specified past the zone (with our sample mylimit zone, the rate limit is 10 requests per second, or 1 every 100ms). A request that arrives sooner than 100ms after the previous ane is put in a queue, and here we are setting the queue size to twenty.
That means if 21 requests go far from a given IP address simultaneously, NGINX forrard the beginning one to the upstream server group immediately and puts the remaining 20 in the queue. It then forwards a queued request every 100ms, and returns 503 to the client just if an incoming asking makes the number of queued requests go over twenty.
Queueing with No Filibuster
A configuration with outburst results in a smooth period of traffic, but is not very practical because it tin make your site appear slow. In our example, the 20th package in the queue waits 2 seconds to be forwarded, at which point a response to information technology might no longer be useful to the client. To address this state of affairs, add the nodelay parameter along with the outburst parameter:
location /login/ { limit_req zone=mylimit outburst=20 nodelay; proxy_pass http://my_upstream; } With the nodelay parameter, NGINX however allocates slots in the queue according to the burst parameter and imposes the configured rate limit, but not by spacing out the forwarding of queued requests. Instead, when a request arrives "also before long", NGINX frontward it immediately as long as there is a slot available for information technology in the queue. It marks that slot as "taken" and does non free it for use by another request until the appropriate time has passed (in our case, afterward 100ms).
Suppose, as before, that the 20‑slot queue is empty and 21 requests arrive simultaneously from a given IP address. NGINX forwards all 21 requests immediately and marks the twenty slots in the queue as taken, so frees 1 slot every 100ms. (If in that location were 25 requests instead, NGINX would immediately forrard 21 of them, mark 20 slots as taken, and decline four requests with status503.)
Now suppose that 101ms after the first set of requests was forwarded some other xx requests arrive simultaneously. Only 1 slot in the queue has been freed, so NGINX forwards 1 asking and rejects the other 19 with status503. If instead 501ms have passed earlier the xx new requests arrive, 5 slots are complimentary then NGINX frontwards 5 requests immediately and rejects 15.
The effect is equivalent to a rate limit of x requests per second. The nodelay option is useful if you desire to impose a rate limit without constraining the immune spacing between requests.
Note: For most deployments, we recommend including the flare-up and nodelay parameters to the limit_req directive.
Ii-Phase Rate Limiting
With NGINX Plus R17 or NGINX Open Source 1.xv.7 you tin can configure NGINX to allow a flare-up of requests to suit the typical web browser request pattern, and then throttle additional excessive requests up to a point, beyond which additional excessive requests are rejected. Two-stage rate limiting is enabled with the delay parameter to the limit_req directive.
To illustrate two‑phase rate limiting, here nosotros configure NGINX to protect a website by imposing a rate limit of 5 requests per second (r/s). The website typically has four–vi resources per page, and never more than 12 resources. The configuration allows bursts of upwards to 12 requests, the first 8 of which are processed without delay. A delay is added after 8 excessive requests to enforce the 5 r/southward limit. Afterwards 12 excessive requests, any further requests are rejected.
limit_req_zone $binary_remote_addr zone=ip:10m rate=5r/southward; server { listen 80; location / { limit_req zone=ip burst=12 filibuster=8; proxy_pass http://website; } } The delay parameter defines the indicate at which, within the burst size, excessive requests are throttled (delayed) to comply with the divers rate limit. With this configuration in place, a client that makes a continuous stream of requests at 8 r/s experiences the following behavior.
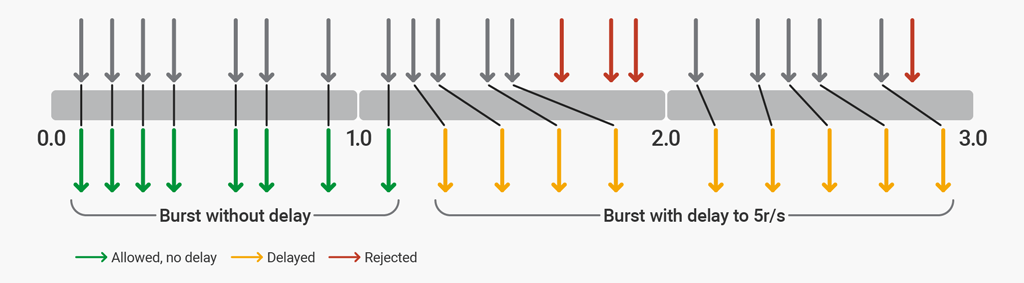
rate=5r/s burst=12 delay=8 The first viii requests (the value of delay) are proxied by NGINX Plus without filibuster. The next 4 requests ( burst - delay ) are delayed so that the defined rate of 5 r/south is not exceeded. The next 3 requests are rejected because the total flare-up size has been exceeded. Subsequent requests are delayed.
Advanced Configuration Examples
By combining bones rate limiting with other NGINX features, you can implement more nuanced traffic limiting.
Allowlisting
This example shows how to impose a rate limit on requests from anyone who is non on an "allowlist".
geo $limit { default 1; 10.0.0.0/eight 0; 192.168.0.0/24 0; } map $limit $limit_key { 0 ""; 1 $binary_remote_addr; } limit_req_zone $limit_key zone=req_zone:10m charge per unit=5r/s; server { location / { limit_req zone=req_zone burst=10 nodelay; # ... } } This example makes use of both the geo and map directives. The geo cake assigns a value of0 to $limit for IP addresses in the allowlist andane for all others. We then employ a map to interpret those values into a key, such that:
- If
$limitis0,$limit_keyis set to the empty string - If
$limitis1,$limit_keyis prepare to the client's IP accost in binary format
Putting the two together, $limit_key is set to an empty cord for allowlisted IP addresses, and to the client's IP accost otherwise. When the start parameter to the limit_req_zone directory (the key) is an empty cord, the limit is non practical, and then allowlisted IP addresses (in the 10.0.0.0/8 and 192.168.0.0/24 subnets) are not limited. All other IP addresses are limited to 5 requests per second.
The limit_req directive applies the limit to the / location and allows bursts of up to x packets over the configured limit with no delay on forwarding
Including Multiple limit_req Directives in a Location
Y'all tin include multiple limit_req directives in a single location. All limits that friction match a given asking are applied, pregnant the most restrictive ane is used. For example, if more than than ane directive imposes a delay, the longest delay is used. Similarly, requests are rejected if that is the effect of any directive, fifty-fifty if other directives allow them through.
Extending the previous example we can employ a charge per unit limit to IP addresses on the allowlist:
http { # ... limit_req_zone $limit_key zone=req_zone:10m rate=5r/s; limit_req_zone $binary_remote_addr zone=req_zone_wl:10m charge per unit=15r/s; server { # ... location / { limit_req zone=req_zone flare-up=10 nodelay; limit_req zone=req_zone_wl burst=20 nodelay; # ... } } } IP addresses on the allowlist practice not match the commencement rate limit (req_zone) but practice match the second (req_zone_wl) and then are limited to 15 requests per second. IP addresses not on the allowlist match both rate limits so the more restrictive one applies: 5 requests per 2nd.
Configuring Related Features
Logging
By default, NGINX logs requests that are delayed or dropped due to rate limiting, as in this case:
2015/06/13 04:xx:00 [fault] 120315#0: *32086 limiting requests, backlog: one.000 past zone "mylimit", client: 192.168.1.ii, server: nginx.com, request: "GET / HTTP/one.0", host: "nginx.com" Fields in the log entry include:
-
2015/06/xiii04:twenty:00– Appointment and fourth dimension the log entry was written -
[error]– Severity level -
120315#0– Procedure ID and thread ID of the NGINX worker, separated past the#sign -
*32086– ID for the proxied connection that was rate‑express -
limitingrequests– Indicator that the log entry records a charge per unit limit -
excess– Number of requests per millisecond over the configured rate that this request represents -
zone– Zone that defines the imposed rate limit -
client– IP address of the client making the request -
server– IP address or hostname of the server -
request– Bodily HTTP request made by the client -
host– Value of theHostHTTP header
By default, NGINX logs refused requests at the error level, as shown by [error] in the case above. (It logs delayed requests at 1 level lower, so warn past default.) To alter the logging level, use the limit_req_log_level directive. Here we set refused requests to log at the warn level:
location /login/ { limit_req zone=mylimit outburst=20 nodelay; limit_req_log_level warn; proxy_pass http://my_upstream; } Error Code Sent to Client
By default NGINX responds with status code 503 (Service Temporarily Unavailable) when a client exceeds its rate limit. Use the limit_req_status directive to set a unlike status lawmaking (444 in this example):
location /login/ { limit_req zone=mylimit flare-up=20 nodelay; limit_req_status 444; } Denying All Requests to a Specific Location
If you want to deny all requests for a specific URL, rather than just limiting them, configure a location block for information technology and include the denyall directive:
location /foo.php { deny all; } Conclusion
We take covered many features of charge per unit limiting that NGINX and NGINX Plus offer, including setting up request rates for different locations on HTTP requests, and configuring boosted features to rate limiting such as the outburst and nodelay parameters. Nosotros accept also covered advanced configuration for applying different limits for allowlisted and denylisted client IP addresses, and explained how to log rejected and delayed requests.
Try out rate limiting in NGINX Plus for yourself – start a free 30‑day trial today or contact united states to discuss your use cases.
Source: https://www.nginx.com/blog/rate-limiting-nginx/